Showing posts with label home decor. Show all posts

Monday, August 1, 2016

defining your style, our home tour

For so many years living in the same home, our style has changed dramatically. As people grow and change, so should your home. Just as you wouldn't wear the same style of clothes for 18 years! 

During the past couple years, I have been working hard at DEFINING our current style. The first reason is because, well, I'm kind of a design dork. And the second reason is because I think it is important and does make a difference as you purchase things and add to your home, whether it be for seasonal decor, new furniture purchases, or liking the latest pillow you see at Target. 

Try to add a word or words to what your style is. You may need to browse Pinterest. Or does someone you know have a style that you love and would like to emulate in your own home? I have several blogger friends that I admire, but none have the exact style I love. I love pieces of what they have, and when put together in my home it looks totally different....which is good! 

Each person and each family is different, being unique is a good thing. So to define OUR style and home, I think of 3 words.


With each pillow I bring in, each new sofa I may be interested in purchasing, or that rug that is on sale....I try to fit it into at least one of these categories. 

And when re-designing one of our spaces in our home (or outside), making sure it has these 3 elements will complete our signature look. The home flows from one room to the next, I want them all to seem put together. Sometimes I can't figure out why I don't love a certain space....but standing back and thinking about what style it has...maybe it might be missing that Earthy element such as a plant or something else from nature. Maybe it's missing something tribal such as feathers or a fun pattern, or maybe it's just missing that vintage farmhouse piece that makes a room cozy.  

I thought that I'd share a small tour of what our home looks like currently....


I've been leaning toward very neutral lately as you can see. Colors from nature...brown, black, white, cream, green, and blue are my favorites and make our home restful. 

So, I rather like the words earthy tribal farmhouseBut also welcoming cozy home! So go ahead and try to name your style, or ask others what they think your style is. I think having a home that reflects you and your purpose is just as important as the clothes you wear or the food you eat. 

I hope you enjoyed this updated mini home tour, things are ALWAYS changing around here, and I hope to share more tours with each big change of season. 
And follow along more of what we like on Pinterest or our day to day happenings on Instagram or Facebook


Wednesday, June 15, 2016

How to Style Your Shelves

                      Laurel & Wolf


I've recently come across Laurel and Wolf , an online interior design service, and I was challenged to show off a "Shelfie" and how I designed it. I thought that it sounded like a great post to reveal one of my personal shelves we keep in our living room. It's a place we showcase all of the graduates on both sides of our families....so basically all of our nieces and nephews. This is getting so full, however, that when the next one graduates I may be finding somewhere else to display them! 

I was given this awesome graphic to follow if you are new to styling shelves:

So now I will break down how mine were done....


STEP 1: TAKE INVENTORY


These are all of our beautiful nieces' and nephews' senior pictures. I usually use frames that I have on hand, and I love mixing up the finishes. Wood, black, and silver are my favorite mix. Which leads to step 2....


STEP 2: CREATE A COLOR PALETTE

Along with the frame finishes, I used the colors that are naturally found in our home....blue, green, and cream. It keeps the shelves from becoming too busy looking even though they are completely filled. These colors were brought mostly with books. 


STEP 3: BEGIN WITH BOOKS


Books add that level of interest and height to our shelves that are sometimes overlooked. Whenever I am doing styling at home or at someone else's house, I always include books. And in this case, I use them stacked by color. 


The basket of books houses most of our proof albums we get from photographers, it's fun to keep them handy to look back through. Baskets are a great filler on shelves, and a handy catchall when cleanup is needed quickly....ha! 


STEP 4: ADD IN ART

The "ART" in this case is our actual photos of the kids. So this is the part of it that gets tricky for me. I like to mix up the colors of frames, the height of the pics, and because I'm a glutton for punishment and am a little OCD....I didn't want any siblings or same family members being right beside each other. 


I added a picture of our wedding day to the top for height, and because of our large family and all the pictures we have of them, this is the only place we have to put a photo of US. (also, the church we were married in has so much meaning to me, and is showcased beautifully in this picture. The books next to it are bibles that belonged to my parents and a hymnal from this church)


Almost done! But you can see that there is something missing. It needs some fillers and some softness. 


STEP 5: TURN UP THE PERSONALITY

Feathers and lace....two of my favorite design accessories. 


STEP 6: TAKE A STEP BACK

Look at your shelves, do they tell the story that you want them to? Is there something missing? I see that there is something missing on the top shelf. I added in some nests after these pictures were taken for this post. But I am always moving, rearranging, and tweaking everything in this house. 


I have the cutest little rattan boho shelving unit that I picked up at a garage sale earlier this month, you can see it on our Instagram. I cannot wait to style those. 


And by the way, Laurel and Wolf's Pinterest is a new obsession of mine. And this new to me website and blog is a great spot for ideas and inspiration! Please click on over and see for yourself....

I'm off to more baseball games today, I think this busy part of summer is almost over. I have some fun posts planned for the next couple months and, hopefully, if I'm organized enough I can keep this going throughout the school year. 

Thanks for coming onto this little blog of ours, and reading the random thoughts of this busy mama who loves her farm and is obsessed with design!


Tuesday, October 27, 2015

Our Recycled Water Trough: an Update and How-To


Good Morning! 
There has been a lot of interest lately in our recyled water trough. 


{our living room 3 years ago}

I first posted about it when I needed help in figuring out where to put it in our home and to showcase what we were showing at the fair. You can see that original post HERE.

Recently, Country Lifestyle featured the photo above from Pinterest. And it has generated a lot of questions and requests for a "How-To". So I am going to attempt to articulate without sounding completely un-knowledgeable about all things tools! And trying to find pictures from 3 years ago was quite a challenge. 

Our son, Wyatt, along with Daddy's guidance, made this as a 4-H project. It's original intention was a tack box for when we show our cattle at the Fair. And we have actually used it down there....I will show pictures of that later in this post. Some of these pictures were taken during the making of it, and others have been taken now with it in our home to show more details and instructions. 


This is the stock tank that we used, it was purchased before we had our automatic waters for our cattle. It had become rusted and not safe to use, so we decided to use it for a totally different purpose! You can purchase a brand new one at Tractor Supply. (It's a 100 gallon for those needing to know the size) 


Using old barn wood that he nailed and glued together, he placed it on top to measure the size of lid needed. He then cut it out with a jigsaw. 

A mama side note: Wyatt looks so young and adorable in this picture! He is wearing safety glasses and was monitored by Dad the whole time! 


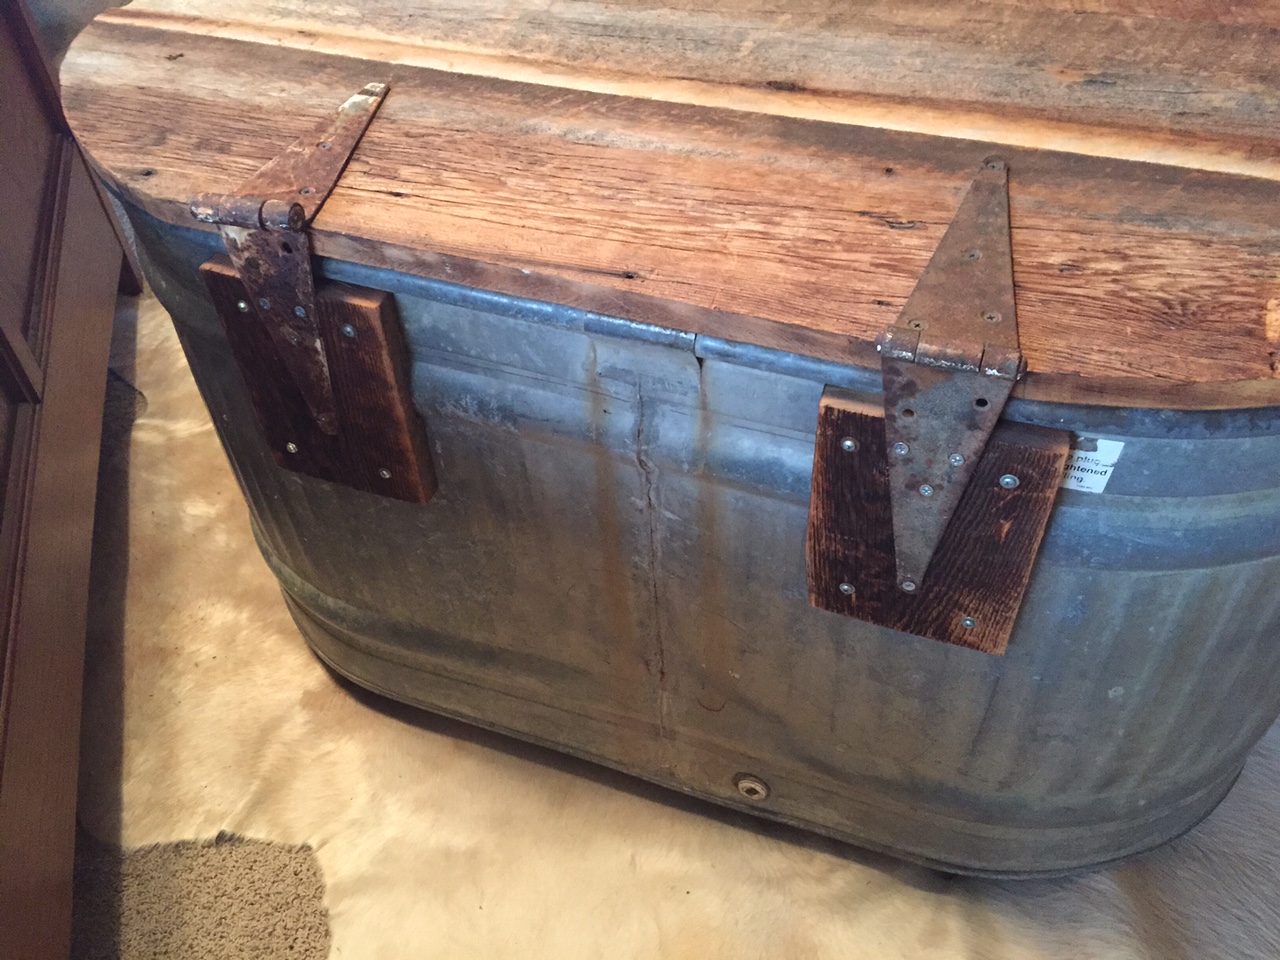
 On the back, 2 pieces of barn wood were attached to make a good base for the hinges. (which were also old and recycled...seeing a theme here? haha)

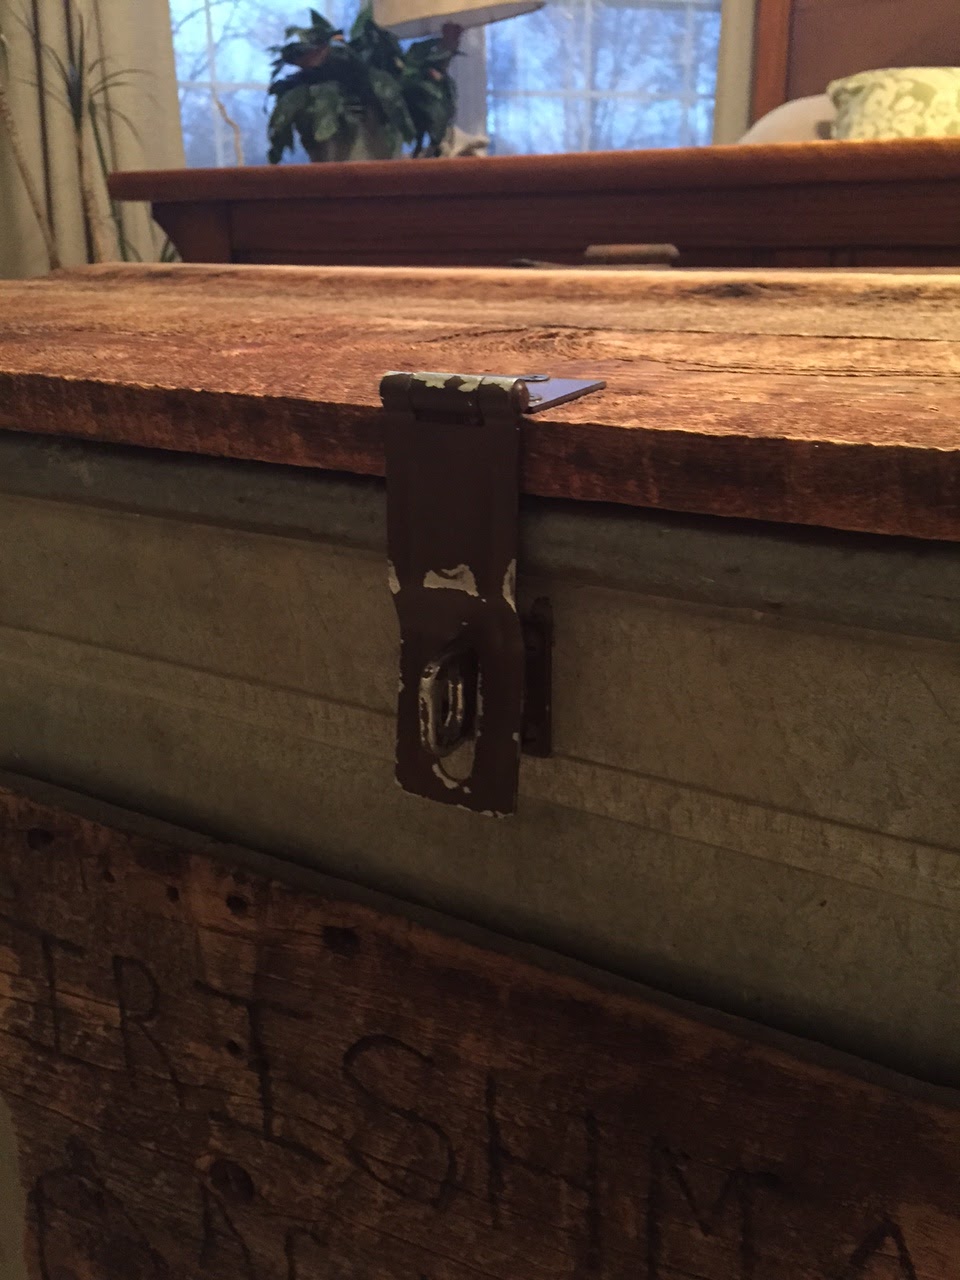
On the front is a used latch we had lying around and spray painted it brown to kind of match the rusty hinges on the back. The paint has kind of chipped and warn off over the years, which I don't mind. I love that this is not perfect. Which makes it perfect!  


Wyatt also likes to wood-burn, so he made a sign to put on the front with our farm name. (this is my favorite part!) He then bolted it to front. 


After cutting holes in the sides with a drill to the size needed, old ropes were used for the handles, which were just zip-tied on the inside. You can see from these current photos that this trunk is now being used as pillow storage in our bedroom! 


The final thing that was added were casters to get this big bad boy around easier, and to me, everything should have casters! 

{at our 4-H County Fair}
{Proud Wyatt with his project}
Can you believe that he just received a blue ribbon for this? Apparently the judge requested that there be a safety closing hinge on it to prevent injuries. Even though it was hurtful that this didn't go on to the State Fair level, we do have to agree that safety comes first. So if you are reading this to make one for yourself, please add a safety hinge! (We still haven't, and haven't had any accidents however)

And to prove that we have loved and abused this.....here are some ways that we have used this workhorse...all of these are from our Instagram page, under the hashtag #ourwatertrough....

At the County Fair as a tack box


In our front room as a Christmas tree holder

 In our living room with our many looks over the last couple years


{a little too tall as a coffee table}
 And in it's current location, at the end of our bed


The funny thing is that it is not, and never really was for long, in the location that it is in the picture that is going around Pinterest, and now Facebook! So I hope this helps those that have asked me to show more details about how this was made. It isn't for everyone to have a recycled item from a farm in your home. But I love objects that make a statement. I love quirky. I love recycled, repurposed, re-used. I love to organize and store things. And most of all, I love my son and ANYTHING he makes! And I'm sure that I will have to fight him for it when he grows up and leaves our nest! 

{our living room 3 years ago}


And if you have one of these water troughs sitting around your yard or farm, and don't want to make a storage piece for your home, you can always use it as a pool like my boys have done. This is another tank we have and I am always dreaming up ideas of how we can use repurpose it! 


Thanks for stopping by my little blog, I hope you come back to follow our journey of our everyday busy life on this hobby farm of ours, and watch as I learn and love making our home into our sanctuary. 


This is "What I NEVER knew that I ALWAYS wanted"

A born and raised city girl, finding the country life to be the real me! Every day is an adventure, and each season brings new excitement and experiences. I am learning and loving the path of finding my true passion....making this little farm our HOME!